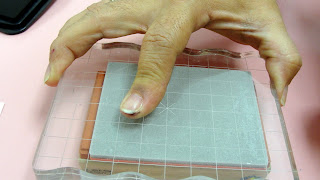
First... THIS is a Mirror Image Stamp. It is what I used to create the opposite image of what the stamp was originally printed as. Pretty simple, the instructions are right on the stamp itself. :-) The flip side looks like this... just plain rubber.
To begin... I inked up the original stamp that I wanted to reverse.
Of course, I don't want the border NOR the excess ink which I managed to get around the image. Clorox Wipes to the rescue!!
Next... you simply stamp the image ONTO the Mirror Image Stamp itself.
Your image will look like this when done. I'm not concerned about the "missing" ink that shows up in the hair part of the stamp. We'll get back to that later. Now... you can "huff" on your stamp and place it on the paper.
Next, to be sure your image lines up correctly when stamping the proper image of the stamp, I use a Stamp-a-ma-jig. But, if you're good at seeing exactly where your stamp will be, feel free to skip this step.
Now, you have BOTH images on your sheet.
And that missing hair section??? Easy... GREAT time for that Copic Multiliner!!! I have never been able to get a solid image so the Multiliner really comes in handy!! And if you think some of the lines are not as solid as you like, simply retrace with the Multiliner.
I hope that explained how to stamp a reverse image. It's so much fun using it on animals as well.
Thanks for stopping by and have a great day!!! *smile*


