Followers

Showing posts with label papertemptress. Show all posts

Tuesday, October 29, 2013

A Good Ol Boy Christmas....


Good morning!!  I am not terribly thrilled to be promoting Christmas at this time of year, but... I'm happy it's not JUNE (though I'm afraid it might be some day!) and we're promoting it. LOL  But.. I admit, working with these funny three guys from Dr. Digi House of Stamps, "We Three Kings", was not at all depressing to me. Hee Hee

If you've never taken a look at Dr. Digi House of Stamps you really should stop by.  The "men" are especially funny and well... ok... might be that I'm just a woman, but omgosh I can't wait to work again with this awesome images.

My sweet men were colored with Copic markers and I printed them off on Cryogen paper which has a bit of a "sparkle" to it and that just added to the "snow" I added below.

My DP came from a "country pack" of paper and I am sorry the cover came off so I can't remember the name of it.

A little twine to finish off my "manly" effects and it's finished.  I love how this came out... now I need to find the perfect man to send it to.  Hee Hee

Thanks for stopping by and have a great Tuesday!  *HUGS*


Signature Follow on Bloglovin Follow Me on Pinterest


Tuesday, July 9, 2013

Dot to Dot....


Happy Tuesday everyone!!!  It was a very long time ago that I did this cute little image from Sherry Baldy Besties which I was lucky enough to name... "Dot to Dot".  :-)

I printed her off on Cryogen White from the Paper Temptress and colored her with two of my favorite colors using my Copic markers.  I distressed the edges of my image and added some ink around the edges to highlight her a bit more.


I added a "friend" definition stamp under one of Tim Holtz Fragments as my sentiment.  I'm sorry I don't remember where it came from... I know I won it but for the life of me can't remember from where.  Ugh!

A little lace, some pearl flourish bling and a nice bundle of flowers for my sweet ladybug friend to rest on finish off my card.

I hope you are having a fabulous summer and that the ladybugs are flying free around your neighborhood.  It is always good to have a "few" bugs that are fun to see, right?  :-)

Thanks for stopping by and have a great day!!! *HUGS*


Signature Follow Me on Pinterest
 Copics I used:

Monday, July 8, 2013

A Little Nesting...


Today I'd like to share a 3D  project I created for The Paper Nest.  Christine was nice enough to share some of her drawings with me and take suggestions I made on a few of them before she finalized them in ink so I wanted to do a little in return for her to thank her for even considering my opinion.  :-)

I used her "Fairy with an Umbrella" on the "P" and "Ladybug Emma" on the "N".  I created these for her to (hopefully) display in her store as a more personal display rather than just cards.  ;-)

The letters were cut using my Silhouette Cameo and some paper I had in my stash.  I printed the images on Cryogen White paper from the Paper Temptress and cut them out after I colored them with my Copic markers.  A few flowers added and a little bling flourishes and my project was finished.

Quick and easy.  I might add that if you decide to do something like the 3D "P" using your Silhouette Cameo, I DID have to add a little weight to the bottom of the "P" to keep it from tipping over to the right.  I think the only thing that frustrates me with the Cameo is that a lot of the cuts don't come with instructions and sometimes those "folds" and "bends" are hard to sit and figure out exactly what goes with what. LOL  In the end, I really enjoyed how they came out.

As always, I appreciate your stopping by and hope you have a fabulous Monday!!!


Signature Follow Me on Pinterest
 Copics I used:

Monday, June 17, 2013

No Limits Friendship...

ptmonday

Happy Monday everyone!!!  Today I'm sharing an easel card I made showcasing the Vellum paper from the Paper Temptress.  I LOVE playing with Vellum and when I saw Sherri Baldy's Asian Besty, I KNEW it would be perfect for making a fan to be a backdrop for my image.  It was perfect to score and so easy to fold.

I stamped it with a few flower images and some butterflies from Theresa Momber's set, "Whimsical Spring".  And I let it THOROUGHLY dry before even attempting to fold the paper.  I used my Copic markers to color in the leaves and flowers and the branches and they worked beautifully on the vellum.

Before scoring my Vellum I added a thin line of Scor Tape to the edge and then sprinkled it with some black glitter.  LOVE it!!  I punched a hole in the bottom and added an eyelet along with some twine that I used to make a tassle at the end.  I used some liquid glue to attach the vellum to my card and since it dried clear, it made no noticeable markings on the Vellum.

I also used the gold from the Laser Lustre pack to border out my black card stock and also to punch a strip for the inside of my card.

Here's another view of the card so you can see how I folded the easel.

ptmondayside

I hope you give the Vellum a try.. it REALLY is fun to work with and not only does it fold well, but it tears well AND does a fabulous job on the printer!!  Oh and... I have made this for an adorable new friend I've made who lives in Thailand.  She is just adorable, though we've never met, I can't wait to send this to her.  Now I hope you realize this DOES stick up on the card quite a bit but I plan to make a pretty box to put it safely in before mailing her way.  :-)

That's it for me today.  Have a GREAT week and thanks for stopping by!!! *HUGS*


Signature Follow Me on Pinterest

Copics I used:
ptmondaycopics


Saturday, May 11, 2013

CMC Challenge with Chelsea Le Designs


Happy Saturday everyone!!! I hope you're having a nice relaxing weekend.  I had to get up EXTRA early this morning to get my son to school.  He's heading to Kansas City with the Jazz Band to perform one last time this year.  Then.... off to Worlds of Fun, Crown Center, Arthur Bryants BBQ and the Jazz Museum!!  Fun fun!! I thought I might go along then I rethought... teens, coach bus, late night pizza party in rooms... nahhh.  I NEED my rest at my old age! LOL

This weeks' challenge at Color Me Creative is "Anything Goes with Coloring".  Always a fav since the sky's the limit!!  This week we used the fabulous Chelsea Le Designs images.  OMGosh her girls are so so darn cute!!! I love every one of them!! You'll want to make sure you enter the challenge for a chance to win FIVE of them!!!  Trust me, you to will love them al!!!

I stamped my image on Cryogen White card stock and colored her with my Copics.  I mounted her on my card using Pop Dots.  The patterned paper is from Carta Bella, "So Noted".  I added a few crystal buttons I found in my stash and put a tiny rhinestone in the middle of each that I colored with my Copics to match my design.  My butterflies were given to me long ago by a secret sister swap I was involved in.  I LOVE this fun package of all different shapes, sizes and patterns of butterflies and for the life of me I can't remember which swap it was from or who!  Sad, I know.  But if YOU sent them to me... thank you!!!! I LOVE them!!

That's it for me today.  I'm going to try to get some creating done in my Heidi Swapp Memory File Album and maybe even do a bit of Smash booking!!!  Have a super Saturday!!!  *HUGS*


Signature Follow Me on Pinterest
 Copics I used:

Friday, May 10, 2013

Rockin with The Paper Nest....


Hi everyone!!! I'm so happy to be sharing my card with you all and truly appreciate Christine asking me to be a guest designer for her today!

Today I'm sharing an adorable image by the The Paper Nest.  This little cutie holds a special place in my heart as Christine drew it especially for my drummer daughter... "Rockin Emily"!!  And trust me... that she does!! Advil... take me away!! LOL  But seriously, she does fabulously after only two years of lessons.

My image was colored with Copics and I added a bit of Memento ink around the edges.  I mounted it with some Pop Dots to give my card a bit more dimension.  I have a few different designer papers here, some from my personal stash and another from BoBunny.

My adorable ribbon, which I can't seem to get enough of, is from the Paper Temptress.  Not sure if it's still available but I have tons so I'm set for a while! Ha!

I added a few paper roses to my card and the teal one is sprayed with some Tattered Angels Glimmer Mist.  I can't remember where my crystal flowers came from but I only had a few and thought they would be perfect here.

My card was created for my daughter's drum teacher.  She loves blues and purples together (a lady after my own heart) and that was my inspiration for my design.  I admittedly, didn't use the sentiments which came with my image but my daughter's teacher is always telling her this so I felt  it fit for me to just write it in.  Hope Christine will forgive me on that.  ;-)

There are so many adorable images at The Paper Nest and I've found myself looking through the store instead of getting busy with this write up.. hee.  So, when you've got time... so browse all the fab images and if you're like me, you'll fill your cart QUICKLY!!!!

Have a fabulous Friday and remember to *HUG* those you love today!!  Thanks again, Christine for allowing me to share my work.  *HUGS*


Signature Follow Me on Pinterest
 Copics I used:

Wednesday, May 8, 2013

Paper Temptress Hops with Heartfelt Creations


Today  Paper Temptress's  Design Team is blog hopping with Heartfelt Creation's  Design Team members combining products from both Heartfelt Creation and Paper Temptress.

I used "Twining Roses" from Heartfelt Creations for my card today.  I colored it with my Copics then cut it out and added Pop Dots to the back to raise it up a bit off my card.  I also paired up my image with the "Garden Romance" die set.  I cut the "fence" three times an added it to the front of the archway.  I also used the little butterfly and bird from this set to add to my card.  My image was stamped on White Cryogen paper from the Paper Temptress as well as used on the fence.  I just love how Copics take to this paper and it is the ONLY one I use for all my Copic coloring.  And... as an added bonus, it has just a slight sparkle/glimmer to it which I adore!!!

Paper Temptress  is donating a $25.00 gift certificate and Heartfelt Creations is giving away  the whole new (and fabulous) Sun Kissed Fleur Collection so make sure you leave a comment on each of the PaperTemptress’s DT’s blog and a message on Heartfelt Creations blog to enter to win.  These are fabulous prizes so make sure you follow directions carefully! You could be one of the two winners.  Winner’s will be selected on May14th so be sure to check back to see if you won!

Hope you enjoy what both teams have designed for you.  Now head on over to your last top, the Paper Temptress Blog.
Thank you for visiting and hope you had fun with the hop. Don't forget to leave a comment the each Design Team members blog. 


Signature Follow Me on Pinterest
 Copics I used:

Tuesday, April 16, 2013

In OUR Family....


Today I wanted to share with you a multi-media canvas I created for my mom's birthday gift this year.  I've often seen these signs all over Pinterest and a few other places and I decided to write me own and add a little "personal touch" to it as well.

I started with a blank canvas and used strips of paper from various pieces I found in my stash.  I simply ripped them and added them to my canvas using Mod Podge. Easy peasy!  I added a few rub ons here and there and then I took our some of the awesome Heavy Duty Vellum from the Paper Temptress!!  Of course, mine is clear but there are many other colors available on the site as well.

I cannot begin to tell you how nice this is to work with.  First... it's not NEARLY as filmsy as a lot of other vellums I've used in the past.  Second... I printed on it using an inkjet printer!!!  OMGosh... I couldn't believe it worked!!  But as you can see... it came out fabulously!!!  I had tried printing on vellum using my laser printer and sadly the ink rubs off.  You would think it would be the other way around.  But nope, the inkjet printer won, hands down!!  

I tore the edges a bit and added some cute little Mini Magnolia images to it here and there and curled up the upper right and lower left corners of the paper using just my fingers.  With strategic placement, I used some Skor Tape to hold my vellum in place on my canvas!  Worked wonderfully!!

I love how the vellum is just the right translucency to allow for the designs of my papers to show throw and now to mute them to much either.  Perfect!  AND... to top it all off... my sweet little roses are also from the Paper Temptress.  I always buy white when I get most my flowers and these are perfect for adding any type of misting spray you have and they dry very quickly!!  Again, if you don't like messing with sprays and mists, the Paper Temptress also offers these flowers in colors too.  I LOVE these little flowers and I know I will be needing more soon!!  

I tied it all together with some of the awesome Turquoise Sheer Elegance ribbon with which mom can hang the plaque from. Ohhhh how I love this ribbon!! It's sheer but has tiny little fiberish threads where the sheer part is... it's not solid like most sheer ribbons are.  You have GOT to see this in real life... LOVE LOVE!!!

Needless to say, my mom LOVED the plaque and so did everyone else in the family.  And... I'm glad I stocked up on vellum because it seems I have a few more to make after sharing mom's with everyone at her party.  Hee  Oh well... when it's family, it's not a bad thing, right?  

Thanks fors stopping by today and remember to grab some vellum for you next crafty and/or multi-media project.  It's wonderful to work with!  *HUGS*


Signature Follow Me on Pinterest

Monday, April 8, 2013

Fly Free.....


Today I'm sharing an image I colored from Saturated Canary, "Angels Among Us", which I posted for a previous Outlawz, Twisted Thursday Challenge.  I've done lots of cards lately and LOTS of coloring... trying to always get better, but not so much blog postings.  I apologize for that.  It seems with all the running and ACTUAL walking around I've done since hubby had his accident I'm pretty much at my exhaustion stage. LOL  I seem to get them created, photographed and sometimes... sometimes, even uploaded.  But to sit and write my post seems to be one of those things I always did at night once everyone went to bed.  Well, needless to say, at days end these days... I'm pretty much sitting with an idle engine.  LOL  So I am terribly sorry to you faithful followers who have been sticking with me and waiting patiently.  I'll make a better effort at it... and maybe... like tonight... I can get a minute to do it earlier!  Keep praying for me... I sure can use it! ;-)

I couldn't resist pairing up Theresa Momber's little bird image from her stamp set, "Birds and Blossoms".  I'm hoping you realize... it IS a silhouette.. I mean.. my sweet Saturated Canary image DOES have pink wings around her. Hee Hee

The beautiful bird cage was a die cut from MarkerPOP!, a Cheery Lynn Design, Bird Cage.  And those tiny sweet roses and crystal flowers ar from the Paper Temptress.

My sentiment is one I cut from SRM stickers which I like to use when I just can't find exactly what I want to use, I love their clear stickers and how I can mix and match with them.

I appreciate your stopping by today and I hope you forgive my shortness of posts in the last couple months.  I also want you to know how much my hubby and I have appreciated all your prayers and thoughts during his recovery.  He is doing wonderful and we are hoping in two more weeks he will get the ok to start attempting to walk again.  As always... blessed to have him with us AND... blessed to have you as a follower of mine!!  God is good!!

Have a fabulous Monday!! *HUGS*


Signature Follow Me on Pinterest
 Copics I used:

Friday, April 5, 2013

Happy Belated Easter....


I know Easter is over, but I couldn't resist putting this up since I waas swamped Easter weekend and didn't get a chance to post it on my regular blog.  But.. I have to say... Magnolia images are to cute to now use no matter if you're late OR early with a holiday! LOL   My sweet image is Ballerina Bunny Tilda.  Isn't she adorable???

I used the Silver from the Laser Lustre pack from the Paper Temptress as my base card and I LOVE how it shimmered with the bling and the glittered tulle I added to the card.  Of course I stamped my Magnolia bunny on he Cryogen White prior to coloring with my Copics.  Under that I added a layer of Autumn Hay Glimmer card stock then a layer of the Rose Quartz, Mica/Metallic.  LOVE all the shimmer these papers add to my card!!!

For my sentiment, I stamped it onto some Xcut Happy Days Ticket Stubs which I stacked a few different ones together to create a bit more dimension to my card.  On the side of it and on my flower middle I added some of my FAVORITE bling from MarkerPOP!Pebbles Candy Dots Crystals Faceted Gems, Peony.  LOVE LOVE these!!!  You have to go check them out as they come in so many different colors.

I hope you had a wonderful Easter.  We were certainly busy and saw lots of family like always on holidays!  Sometimes it's not a BAD thing. LOL

Thanks for stopping by today!! *HUGS*


Signature Follow Me on Pinterest
 Copics I used:

Tuesday, March 19, 2013

Believe....


Happy Tuesday everyone!!!  Today I wanted to share  card with you I made using the Brown Bag Kraft Paper.  This is AMAZING paper and, if you didn't know...it comes in several colors!!!  I used the Blueberry Brown on my card above.

To really get the full affect of the kraft showing through on my card, I spritzed it with water a bit then crumpled it up in my hand.  I flattened it out then used my heat tool to dry it completely.  Just to add a bit more grunge to it AND to show the kraft underneath, I lightly sanded it across the top until I go the desired kraft showing.

I LOVE this paper and not only can you leave it flat and scuff it up a bit with sand paper and crumple it up to add texture, you can also run it through an embossing machine and run your sand paper over the embossing area to show the texture created.

I haven't used this paper in quite some time and I can honestly say it is one of my favs and I will definitely be using it again soon!!  I had forgotten how fun it was to create with it.  Give it a try and I be you'll be hooked in no time as well.

My card today uses "Pint Sized Love" from the Saturated Canary.  I stamped her on Cryogen paper and colored her with my copics.  

I've been doing lots of practicing on hair coloring lately and I was really happy with how this one came out. Here's a close up... what do you think???  I'm open to all the help I can get. LOL


I hope you have a great day and remember to give all the papers from the Paper Temptress a try.  You never know what could bring on just the inspiration you need!!

Thanks for stopping by and have a great day!!! *HUGS*


Signature Follow Me on Pinterest
 Copics I used:

Tuesday, March 5, 2013

Thanks In Style...


Today I'm sharing some awesome paper and an awesome stamp set!  My sweet friend, Carolyn King's stamp set released at Gina K Designs last month is one of my all-time FAVORITES ever!!!!  
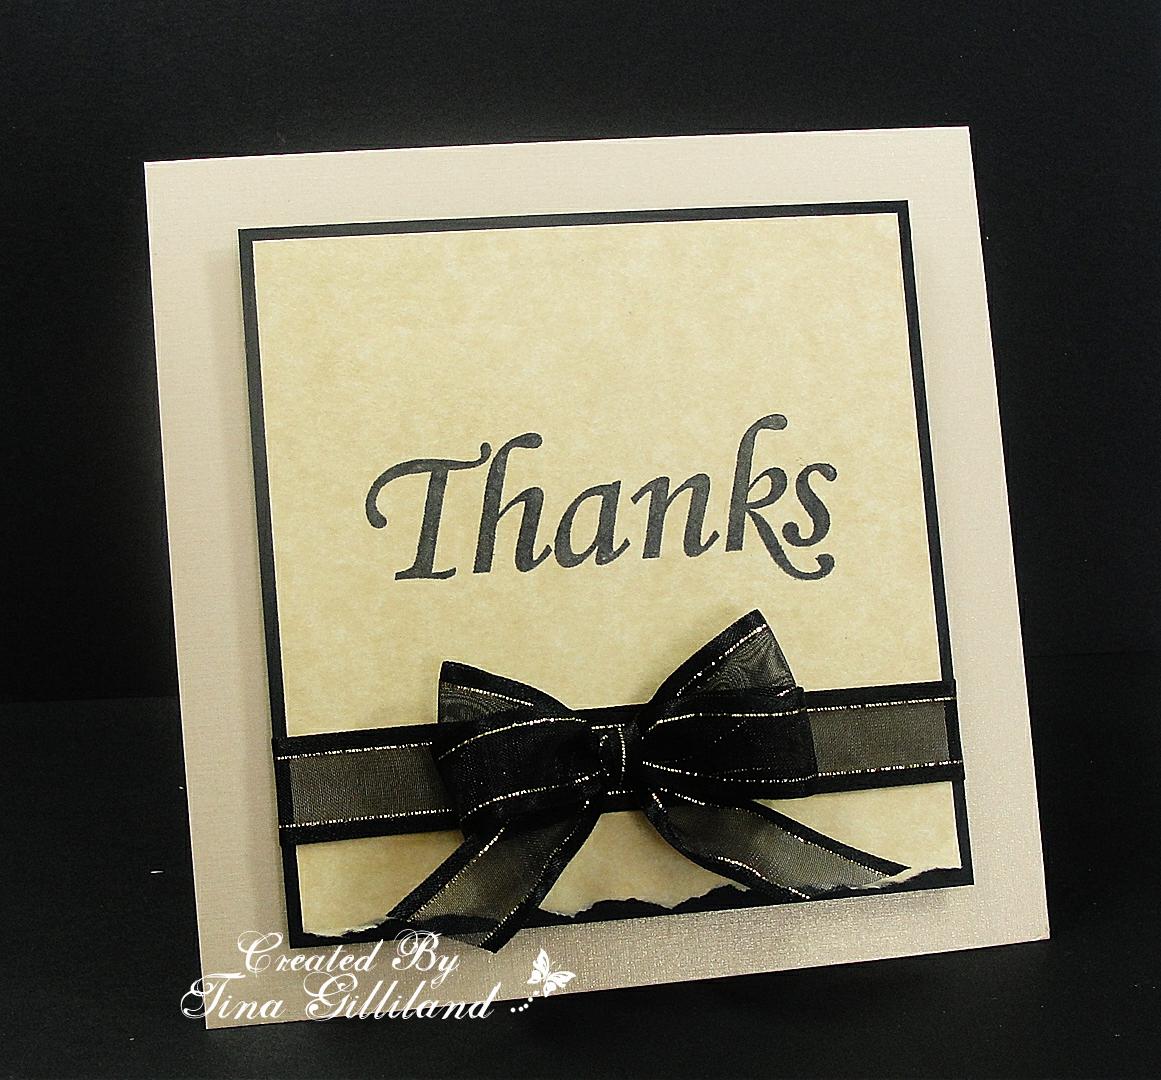
"Stamp it BIG!" is perfect for a CAS card and... I can't wait to use them in my SMASH books and Project Life book!

And... for the paper!!  Oh yes... another TWO favs from the Paper Temptress!!!  I truly love working with Parchment paper and as you can see below... it tears so nicely and has the best fibers to make any card look wonderfully classes and expensive!!  The other paper I adore is the Gold Linen!!

I tried to get a close up so that you can see how nice the fibers look after tearing on the Parchment and though it was a bit difficult, you can see to the left the shimmer to the Gold Linen.  Both just awesome when you need a bit more formal look to your card.


My card also features one of favorite ribbons as well, "Pure Luxury Gold Lined" also from Gina K Designs.

Put all these wonderful products together and you can't help but get one classy, stylish thank you card that I am sure someone will love to get!!  I'm not big on CAS cards but I admit, even I love the rich look that these items added together created!

I hope you have a great Tuesday!  I am off early this morning with my daughter's 5th grade band members heading to my son's high school for the Band Extravaganza!  They are gathering all the band members from the 5th graders through 8th graders on the south side and putting on one heck of a show for them!  I've heard about this for years since my son started going when he was in 5th grade.  They really WOW the kids and get them all psyched up hoping they continue with their instruments and eventually join the high school band when they arrive.  It was one of Steven's favorite times and now that he's a part of the show, he's even more thrilled to have his sister attend her first!  Anxious to see what all the hype is myself.  Hee Hee

I'm pretty happy that both my kids adore music and I'm even prouder when they do a fabulous job at their concerts and recitals and judgings.  Steven celebrated his 10th year of piano, 7th year of clarinet and 2nd year of saxophone this year.  Emily played piano for two years (she decided she didn't care for it as much) and is currently on her 2nd year of drums and 2nd year of trumpet.  They both seem to be "naturally gifted" (if there is such a thing) to playing instruments because they RARELY practice and when they are judged, they never cease to amaze me with getting blue and red ribbons every time!  I'm sure they got all that talent from me. Hee Hee

Thanks for stopping by and I'll hopefully get some good pictures from Band Extravaganza to share tomorrow! ;-)  *HUGS*


Signature Follow Me on Pinterest

LinkWithin

Related Posts Plugin for WordPress, Blogger...