We have a LOT of prizes; read the directions carefully!
This isn't just an ordinary blog hop! There are 8 blogs for you to visit. Each blog has either a tutorial on how to make something or a technique pertaining to paper crafting!
Each blog has a prize, and there is a grand prize for one person who visits and leaves a comment on all 8 blogs.
To be eligible for the prizes, please leave a comment on each blog. If you become a follower you will have two chances for that blog's prize! Each blog has different prizes, so you will want to visit all of them! Let's get hopping! Have fun and good luck! To win the grand prize for visiting all the blogs and leaving a comment for each one - return to the
2000 Party Tutorial Blog Hop page and enter your name at the bottom of the page by clicking on the blue froggy (add your link).
Blog Hop Order
YOU DO NOT NEED TO ENTER YOUR URL CODE IN INLINKZ.
However, please enter the name you used to join THE OUTLAWZ so we can find you if you're the lucky winner. Only enter your information AFTER LEAVING A COMMENT ON EACH BLOG! GOOD LUCK!
The winner of my post will receive
THREE DIGITAL IMAGES from
Dilly Beans Digi Stamps!!!
Here's MY tutorial:
ADDING GLITTER IN DETAILED AREAS
I LOVE all things sparkly and bright and adding glitter is a fabulous way to get just that effect!! But... did you know about the
"Quickie Glue Pen"???? Yep.. that's what it's called.. no way I could make THAT up! LOL With this pen... YOU control WHERE the glue and glitter go. Even in the smallest or thinnest areas. Let me show you how I did this card.
First... you'll want to make sure you color your image completely. On my example I DID use colored glitter but.. I didn't want my entire image covered, so coloring is important. Plus, if you miss an area with the glitter, you won't notice it at much if the image is colored.
Next I cut out my image because I wanted to mount on her a colored/DT papered background.
Now the Glue Pen. It's just like an ink pen so using it is very easy. You could easily write a name with this and glitter it as well. Here's what the pen looks like.
You'll only "write" where you want the image to be glittered. I started with her "shell top" and added a bit to her "hips" area. Then... I went to just the areas of her tail I wanted to highlight.
If you look closely you can see the blue glue along the black lines of the area on her tail I used it on already.
Next, lay a heavy coat of glitter so as not to miss any glued areas.
Shake off the excess and continue through with the others areas you want glittered. As you can see... the glitter/glue didn't cover much of my coloring which is what I wanted. Just a bit of sparkle and a bit of color to accent the color already there.
And for a bit of added effect... I added a few lines to my background (to give it a bit of a glimmered water effect) by simply drawing a few lines here.
And here it is... all finished and glittered in only the spaces I want.
Hope you enjoyed the tutorial! Enjoy the rest of the hop and remember to add your comments and add the links over at the
Outlawz 2000th member area.
Added note: HERE is a link to get your Quickie Glue Pen. :-)
Thanks for stopping by!!! *HUGS*

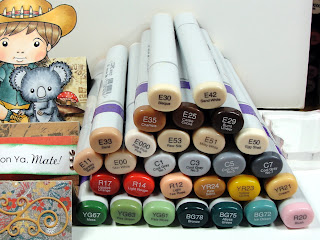
Copics I used:


